
Ever thought about making a creamy, golden cheesecake bar in just a few steps? The cheesecake bars recipe you’re about to learn makes it easy. It breaks down the myths of complicated baking.
No need for fancy steps or tools. This guide shows you how to make silky cheesecake bars in two easy steps. You won’t have to worry about cracked tops or uneven layers. It’s perfect for any occasion, and it’s easy to make.
Table of Contents
Key Takeaways
- A 2-step method cuts prep time by over 50%
- Uses common pantry staples, no fancy ingredients required
- Guaranteed to stay moist and creamy every time
- Adjustable for gluten-free or seasonal flavor twists
- No-bake options included for last-minute needs
Getting Started: Ingredients and Tools
Print
Cheesecake Bars Recipe: 2-Step Magic for Stress-Free Treats
- Total Time: 4 hours { including Chill time)
- Yield: 16 Bars 1x
- Diet: Vegetarian
Description
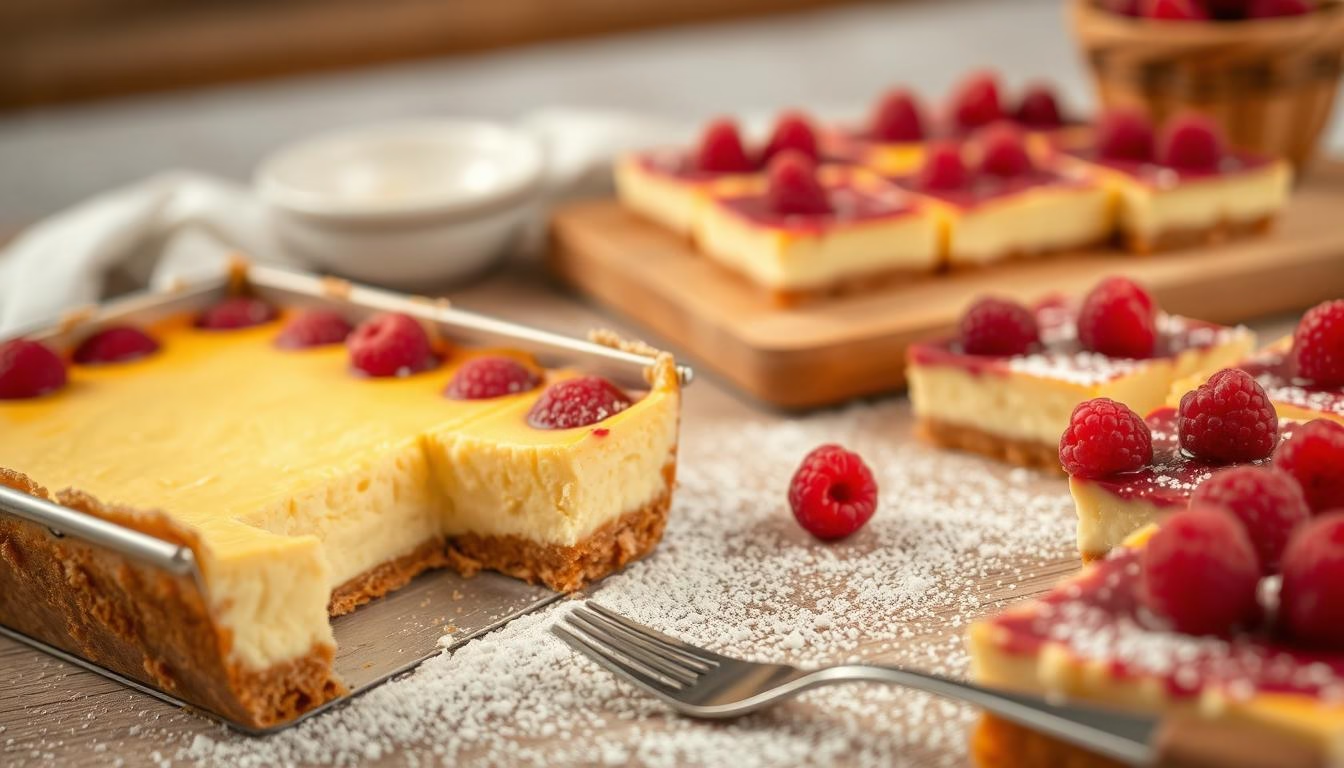
These creamy and simple Cheesecake Bars are made with a buttery graham cracker crust and a smooth, tangy filling. They’re perfect for potlucks, birthdays, or everyday dessert cravings.
Ingredients
- 1 ½ cups graham cracker crumbs
- ¼ cup granulated sugar
- ½ cup unsalted butter, melted
- 16 oz (2 packages) cream cheese, softened
- ½ cup sour cream
- ¾ cup granulated sugar
- 2 large eggs
- 1 tsp vanilla extract
Instructions
- Preheat oven to 325°F (163°C). Line an 8×8 inch pan with parchment paper.
- In a bowl, mix graham cracker crumbs, sugar, and melted butter until well combined.
- Press the mixture firmly into the bottom of the prepared pan. Bake crust for 10 minutes, then let cool.
- In a mixing bowl, beat softened cream cheese until smooth. Add sugar and beat until combined.
- Mix in sour cream, eggs, and vanilla extract. Beat until the mixture is creamy and lump-free.
- Pour the filling over the cooled crust. Spread evenly with a spatula.
- Bake for 30–35 minutes, or until the center is just set.
- Cool completely, then refrigerate at least 3 hours before slicing into bars.
- Use a sharp knife to cut into clean bars. Serve chilled
Notes
- `Chill the bars thoroughly for clean slices.
- Top with fruit, chocolate drizzle, or whipped cream for added flair.
- Store leftovers in the fridge for up to 5 days.
- Prep Time: 15min
- Cook Time: 35mins
- Category: Dessert
- Method: Baking
- Cuisine: American
Nutrition
- Serving Size: 1 bar
- Calories: 280
- Sugar: 20g
- Sodium: 220mg
- Fat: 19g
- Saturated Fat: 11g
- Unsaturated Fat: 7g
- Trans Fat: 0g
- Carbohydrates: 23g
- Fiber: 0g
- Protein: 4g
- Cholesterol: 75mg
Keywords: cheesecake bars, easy cheesecake bars, dessert squares
Before you start baking, make sure you have all the ingredients and tools for homemade cheesecake bars. The right ingredients and tools are key to getting perfect results. Let’s look at what you’ll need.
- Ingredients: Cream cheese (8 oz), sugar, eggs, vanilla extract, graham cracker crumbs, butter.
- Tools: 9×13-inch baking pan, mixing bowls, electric mixer, spatula.
| Item | Purpose |
|---|---|
| Cream cheese | Choose full-fat brands like Philadelphia for richness |
| Electric mixer | Ensures smooth batter consistency |
| Graham cracker crumbs | Use store-bought or homemade (grind crackers in a food processor) |
Pro tip: Use room-temperature ingredients for even mixing. Avoid overmixing to prevent cracks. Keep this checklist handy for stress-free prep. Every tool and ingredient is important for that perfect homemade cheesecake bars texture and flavor.
Step 1: Preparing Your Base
Creating perfect easy cheesecake bars begins with a solid base. This base is key for a dessert that holds together and balances flavors. Here’s how to make a base that’s both crisp and tender.
Gathering Fresh Ingredients
For a flawless base, you’ll need these essentials:
- Graham cracker crumbs (unsalted)
- Unsalted butter (melted)
- Sugar (1–2 tablespoons)
- Vanilla extract (optional)
| Pan Size | Graham Crackers (oz) | Butter (tbsp) | Sugar (tbsp) |
|---|---|---|---|
| 8×8-inch | 12 | 6 | 1 |
| 9×13-inch | 16 | 8 | 2 |
Mixing Techniques for Consistency
To avoid a crumbly or soggy base, follow this order:
- Mix dry ingredients in a bowl until they’re evenly blended.
- Add melted butter slowly to prevent clumps.
- Press the mixture firmly into the pan with the back of a spoon.
Step 2: Baking and Assembling
First, preheat your oven to 325°F. Then, bake the crust for 15 minutes until it’s golden. Next, pour the cheesecake filling over the warm crust to seal it.
Bake for another 30-40 minutes. The edges should be firm, but the center should jiggle slightly. A clean toothpick near the center means it’s done. Let it cool completely on a wire rack to avoid crumbling.
After cooling, add toppings like fresh fruit, chocolate chips, or nuts. Spread them evenly and chill for 1-2 hours. Serve chilled for the best texture.
The key is balancing crisp edges with a creamy center. Overbaking ruins the soft interior. Use a knife dipped in hot water to cut clean slices.
- Brush the crust with melted butter before adding filling for extra crispiness.
- Let the mixture sit 10 minutes before baking to eliminate air bubbles.
- Store in an airtight container for up to 5 days.
Patience is key here. Rushing to cut too soon creates crumbly edges. Proper cooling ensures your delicious cheesecake bars hold their shape and flavor.
Experiment with toppings like caramel drizzle or mint leaves. They elevate presentation without sacrificing taste.
Tips for a Stress-Free Baking Experience
Mastering the best cheesecake bars starts with smart preparation. These strategies simplify the process. This way, you can focus on creativity and enjoyment.

Time-Saving Hacks
- Pre-measure ingredients before starting to avoid pauses.
- Opt for pre-made graham cracker crusts to save 20+ minutes.
- Use a silicone baking mat to cut cleanup time by half.
Error-Proof Methods for Every Baker
- Always use room-temperature cream cheese to prevent lumps.
- Test oven temperature with a thermometer for even baking.
- Cool bars in the fridge for at least 4 hours to ensure firmness.
Remember: Consistency comes with practice. Embrace small mistakes as part of learning. Every imperfection is a step closer to perfect best cheesecake bars.
Mastering the Cheesecake Bars Recipe
Getting quick cheesecake bars right means paying attention to small details. These details can make a huge difference. Here are some tips to help you achieve creamy centers and crisp edges:
- Let ingredients come to room temperature before mixing—this ensures a silky batter.
- Use a 9×13-inch pan for even baking and avoid overfilling the mixture.
- Let the pan cool completely before chilling to prevent sogginess.
Timing is everything. Overbaking can make quick cheesecake bars dry. So, set a timer 5-10 minutes before the recipe says. Look for a slightly jiggly center—it will firm up as it cools. Don’t open the oven door too often, as it can cause cracks.
Invest in a good springform pan for easy release and even baking. Use Silpat mats or parchment paper liners to prevent sticking without grease. Add-ins like nuts or chocolate chunks should be added last, but keep them under ¼ cup to maintain structure.
Practice makes perfect. Adjust the sweetness to your liking by adding ½ tsp lemon zest or a drizzle of caramel sauce. These small changes can turn simple quick cheesecake bars into a memorable dessert in under an hour.
Elevating Your Bars: From Classic to Gourmet
Turn simple cheesecake bars into stunning desserts with creative ideas. Even simple recipes can become amazing with bold flavors and artistic touches. Start experimenting to make your kitchen creations unforgettable.
Incorporating Unique Flavors
Take your simple cheesecake bars to new heights with these additions:
- Citrus Zest: Add lemon or orange peel to your batter for a bright, zesty kick.
- Spiced Variations: Stir in cinnamon, cardamom, or a dash of espresso powder for depth.
- Chocolate Lovers: Mix in chopped dark chocolate or swirl in peanut butter for texture contrasts.
Presentation and Garnishing Tips
Follow these steps for restaurant-worthy plating:
- Cut bars neatly with a hot knife for clean edges.
- Drizzle with caramel or white chocolate sauce in a zigzag pattern.
- Top with fresh fruit like raspberries, kiwi slices, or edible flowers.
“Presentation turns a good dessert into a story. Every bite should surprise the eyes before the taste buds.”
Pair simple cheesecake bars with a dusting of powdered sugar or a sprinkle of sea salt. Serve on a mirrored tray or bed of fresh herbs for an elegant touch. Let creativity guide you—gourmet flair starts with confidence in your basics.
Ensuring Quick yet Delicious Results
Speed and quality can go hand in hand when making classic cheesecake bars. Learn how to save time without losing flavor. You’ll also master the perfect texture balance. Every trick here ensures your dessert is top-notch.
Shortcuts Without Sacrificing Taste
- Use pre-measured ingredients to cut prep time by half.
- Opt for store-bought graham crackers to skip crust prep.
- Let stand at room temperature: cream cheese and eggs save mixing time and ensure smooth blending.
Balancing Crispy and Chewy Textures
| Aspect | Technique |
|---|---|
| Crust crispiness | Bake crust alone for 10 minutes before adding filling. |
| Cheesecake moisture | Use low-and-slow baking (325°F/160°C) for 30-35 minutes. |
| Edge definition | Turn off oven and let bars cool inside for 1 hour—prevents cracks and enhances edges. |
Timing and temperature control are key. Follow these steps for a golden crust and a velvety center. Adjust oven settings slowly to keep flavors in without overbaking.
Serving, Storing, and Enjoying Your Creation
After baking and cooling your gourmet cheesecake bars, it’s time to show off. Serving and storing them right keeps every bite as good as the first. Chill them in the fridge for at least an hour before serving to improve their texture.

For a nice presentation, place slices on a clean white plate. Add a sprinkle of sea salt or a drizzle of caramel. Top with whipped cream or fresh fruit compote for extra style. For events, serve them on a fancy platter at a cool temperature.
- Serve chilled for a creamy mouthfeel
- Use edible gold leaf for a luxurious touch
- Pair with coffee or sparkling wine for flavor contrast
Storing them right keeps them fresh. Store uneaten bars in an airtight container in the fridge for up to 5 days. When reheating, let them sit at room temperature for 10 minutes. Then, microwave in 15-second bursts on 50% power. Don’t overheat to avoid sogginess.
Want to share your gourmet cheesecake bars with others? Use a hot knife for clean slices. Store leftovers in a sealed container and enjoy within a week for the best taste. These tips help ensure every bite is as delicious as you made it.
Conclusion
Ready to make creamy cheesecake bars without the hassle? This recipe’s two-step approach ensures stress-free baking. It blends simplicity with rich flavors. Whether for family dinners or weekend treats, focus on quality ingredients and precise techniques.
Customize your batch with add-ins like crushed graham crackers or fresh berries. Brands like OXO offer nonstick pans that prevent sticking, guaranteeing even browning. Share your variations online using #CheesecakeBarsMaster to join a community of home bakers. Every adjustment—from cinnamon-spiced crusts to swirls of dulce de leche—turns this classic into a personalized masterpiece.
Confidently adjust recipes to suit your taste. Store leftovers in airtight containers for up to five days. These bars are ideal for gatherings, office treats, or casual brunches. Start baking and savor desserts that taste homemade but feel effortless.
FAQ
What ingredients do I need for the cheesecake bars recipe?
To make the best cheesecake bars, you’ll need cream cheese, sugar, eggs, and vanilla extract. You’ll also need your favorite crust ingredients, like graham crackers or Oreo cookies. Using high-quality ingredients will make your cheesecake bars extra delicious!
How can I ensure my cheesecake bars turn out creamy?
For creamy cheesecake bars, mix your cream cheese until it’s smooth. Don’t overmix after adding eggs. This can make the bars crack during baking.
Can I customize the flavors of my cheesecake bars?
Yes, you can! Add unique flavors to make your cheesecake bars special. Try citrus zest, chocolate chips, or flavored extracts like almond or raspberry. This will make your cheesecake bars stand out.
What’s the best way to store leftovers?
Store your cheesecake bars in an airtight container in the fridge. They’ll stay fresh for 3 to 5 days. You can also freeze them for up to 2 months. Just wrap them well to prevent freezer burn.
Do I need special tools to make these cheesecake bars?
No special tools are needed! Just basic kitchen stuff like a mixing bowl, whisk or electric mixer, and a baking dish. A parchment paper liner can help with easy removal, making the process simpler.
Can I make these cheesecake bars gluten-free?
Yes, you can make gluten-free cheesecake bars. Use gluten-free graham crackers or a gluten-free alternative for the crust. Make sure all ingredients are labeled gluten-free for a safe and tasty treat!